원문은 아래와 같다.
Setting the datasource for a Report at runtime

This is one of the most common questions on the ReportViewer Forum. So rather than answer it repeatedly, I will answer it here.
The Basic Idea
The basic idea is to tell your report what type of data it should expect to receive, then at runtime, provide the report with this data before displaying it. All in all it's actually pretty simple. A common stumbling point is to use the wizards or designer to setup the data, which makes some assumptions that don't work for this scenario.
Prepare the Report
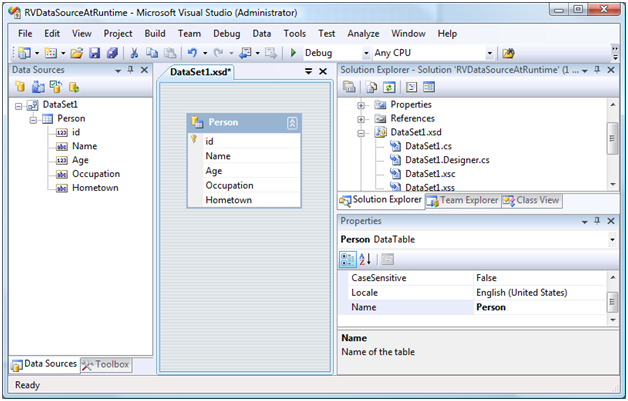
Before you can effectively design your report, you need to set up the data for it. You're not providing an actual data source, instead informing the report what type of data it should expect: the data types, field names, etc. The easiest way to do this is to add a DataSet to your project. Right click on your project in the solution explorer and add a new item. Select to add a DataSet, your project should be updated with an .xsd file and you should find it opened in the DataSet designer (as the image below shows.) Once added, use the DataSet designer to design what the schema of your data looks like.
This DataSet needs to exactly match your actual data, schema-wise.
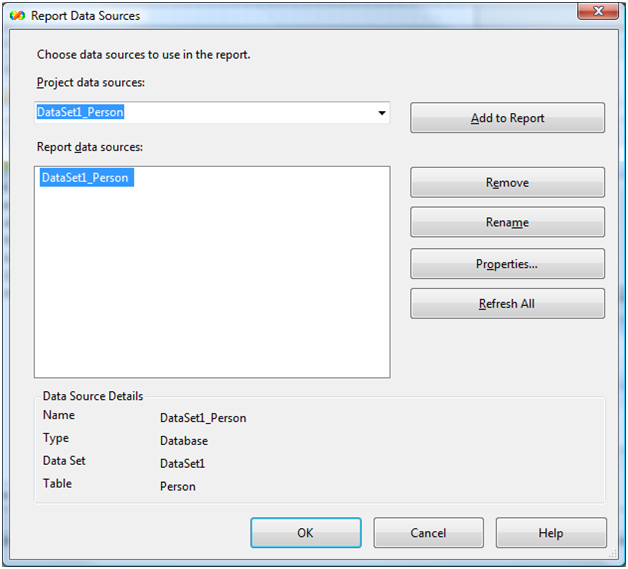
Now, add this DataSet as a DataSource for your report. In the report, go to the Report menu, select DataSources, and add the DataSet
With the DataSet added, it is now available in the Data Sources palette, and you can drag fields into your report in order to design it. Once your report is designed the way you like, you need to add it to your ReportViewer in your form.
Specifying the Report in the ReportViewer
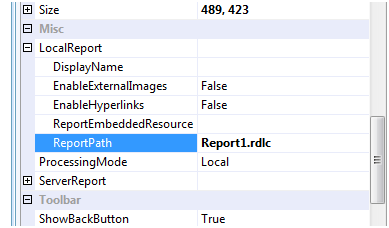
This part is crucial. You must specify the report to be used via the PropertyGrid, not the smart tags on the ReportViewer. If you use the smart tags, it acts somewhat "wizard" like and will do more for you than you want, it will add code in the Designer file to setup the DataSet you added as the datasource at runtime too. You don't want that, that DataSet was just to design the schema of the data; at runtime it would be empty and useless. If you use the PropertyGrid instead, none of these extra operations will take place.

Hooking up the DataSource at Runtime
Finally, you need to let the ReportViewer know where to get the actual data from so it can feed that into the report. In your form's OnLoad method (or wherever is appropriate for your application), you need to add code much like this:
private void Form1_Load(object sender, EventArgs e) {
     // somehow get the data at runtime, application specific
     this.myData = GetDataSource();

     this.reportViewer1.LocalReport.DataSources.Add(new ReportDataSource("DataSet_Person", myData));
     this.reportViewer1.RefreshReport();
}
Notice we are adding a DataSource to the ReportViewer. This is the bridge from your data into the report. Key here is the name you specify for the ReportDataSource, it must match the name found in the .rdlc file for this dataset. This name was determined by how you named the DataSet you added to your project and designed. If you view the .rdlc file in the XML editor (right click it and select "Open With..." then pick "XML Editor"), you will find a <DataSets> node, containing a <DataSet> node, this node is the report's understanding of the data for this report, and what your actual data will map to at runtime. Notice the Name attribute of the DataSet node, this is the name you need to specify in the ReportDataSource constructor.
  <DataSets>
    <DataSet Name="DataSet1_Person">
      <Fields>
        <Field Name="id">
          <DataField>id</DataField>
          <rd:TypeName>System.Int32</rd:TypeName>
        </Field>
        <Field Name="Name">
As your application runs you may wish to switch that data source to something else. Just clear out the ReportDataSource collection, and perform the above steps again.
Updating the DataSource
Later on in your development you might realize your data needs a different schema. This is easy to fix. Go back into the DataSet designer, make the changes needed and save the DataSet. Then, return to the report, go into the Report menu, select DataSources... then select "Refresh All". Click "OK", then save the report. Your report has been updated.
Conclusion
That's all there is to it. Obviously my example is quite a bit more simple than a real application, but the concept is the same. If you have more than one data source, then just repeat the above process once for each data source, and at runtime, add one ReportDataSource for each of your data sources. You can skip the dummy DataSet process altogether and design your schema directly in the .rdlc file, but using the DataSet designer is much easier, not to mention any future changes you make are easy to update in the report.
한글 번역본은 다음과 같다.
런타임 시 보고서의 데이터 소스 설정

이 질문은 ReportViewer 포럼 에서 가장 자주 묻는 질문 중 하나입니다 . 따라서 반복해서 답변하기보다는 여기서 답변드리겠습니다.
기본 아이디어
기본적인 아이디어는 보고서에 어떤 유형의 데이터를 수신해야 하는지 미리 지정한 다음, 런타임에 보고서에 데이터를 제공한 후 표시하는 것입니다. 전반적으로 매우 간단합니다. 흔히 발생하는 문제는 마법사나 디자이너를 사용하여 데이터를 설정하는 것인데, 이 경우 이 시나리오에는 맞지 않는 몇 가지 가정이 적용됩니다.
보고서 준비
보고서를 효과적으로 디자인하려면 먼저 데이터를 설정해야 합니다. 실제 데이터 소스를 제공하는 것이 아니라, 보고서에 필요한 데이터 유형(데이터 유형, 필드 이름 등)을 알려주는 것입니다. 가장 쉬운 방법은 프로젝트에 데이터 세트를 추가하는 것입니다. 솔루션 탐색기에서 프로젝트를 마우스 오른쪽 버튼으로 클릭하고 새 항목을 추가합니다. 데이터 세트 추가를 선택하면 프로젝트가 .xsd 파일로 업데이트되고, 데이터 세트 디자이너에서 해당 파일이 열립니다(아래 이미지 참조). 데이터 세트가 추가되면 데이터 세트 디자이너를 사용하여 데이터 스키마를 디자인합니다.

이 데이터 세트는 스키마 측면에서 실제 데이터와 정확히 일치해야 합니다.
이제 이 데이터셋을 보고서의 데이터소스로 추가하세요. 보고서에서 [보고서] 메뉴로 이동하여 [데이터소스]를 선택하고 [데이터셋]을 추가하세요.

데이터셋이 추가되었으므로 이제 데이터 소스 팔레트에서 사용할 수 있으며, 필드를 보고서로 끌어서 디자인할 수 있습니다. 원하는 대로 보고서를 디자인한 후에는 폼의 ReportViewer에 추가해야 합니다.
ReportViewer에서 보고서 지정
이 부분이 중요합니다. ReportViewer의 스마트 태그가 아닌 PropertyGrid를 통해 사용할 보고서를 지정해야 합니다. 스마트 태그를 사용하면 마치 "마법사"처럼 작동하여 원하는 것보다 더 많은 작업을 자동으로 처리합니다. 또한, 런타임에 데이터 소스로 추가한 DataSet을 설정하는 코드를 Designer 파일에 추가합니다. 이 DataSet은 단순히 데이터 스키마를 디자인하는 용도일 뿐이므로 런타임에는 쓸모가 없어집니다. PropertyGrid를 대신 사용하면 이러한 추가 작업이 발생하지 않습니다.
런타임에 DataSource 연결하기
마지막으로, ReportViewer가 실제 데이터를 어디에서 가져와 보고서에 입력할 수 있는지 알려줘야 합니다. 폼의 OnLoad 메서드(또는 애플리케이션에 적합한 곳)에 다음과 같은 코드를 추가해야 합니다.
private void Form1_Load(object sender, EventArgs e) {
     // somehow get the data at runtime, application specific
     this.myData = GetDataSource();

     this.reportViewer1.LocalReport.DataSources.Add(new ReportDataSource("DataSet_Person", myData));
     this.reportViewer1.RefreshReport();
}
ReportViewer에 DataSource를 추가하는 것을 알 수 있습니다. 이는 데이터와 보고서를 연결하는 다리 역할을 합니다. 여기서 중요한 것은 ReportDataSource에 지정하는 이름이며, 이 데이터세트의 .rdlc 파일에 있는 이름과 일치해야 합니다. 이 이름은 프로젝트에 추가하고 디자인한 DataSet의 이름에 따라 결정됩니다. XML 편집기에서 .rdlc 파일을 보면(파일을 마우스 오른쪽 버튼으로 클릭하고 "연결 프로그램..."을 선택한 다음 "XML 편집기"를 선택) <DataSets> 노드가 있습니다. 이 노드는 보고서에서 이 보고서의 데이터를 이해하고, 런타임에 실제 데이터가 매핑되는 위치를 나타냅니다. DataSet 노드의 Name 속성을 알 수 있는데, 이 이름은 ReportDataSource 생성자에서 지정해야 합니다.
  <DataSets>
    <DataSet Name="DataSet1_Person">
      <Fields>
        <Field Name="id">
          <DataField>id</DataField>
          <rd:TypeName>System.Int32</rd:TypeName>
        </Field>
        <Field Name="Name">
애플리케이션이 실행되면서 해당 데이터 소스를 다른 데이터 소스로 전환하고 싶을 수 있습니다. ReportDataSource 컬렉션을 지우고 위 단계를 다시 수행하세요.
데이터 소스 업데이트
나중에 개발 과정에서 데이터에 다른 스키마가 필요하다는 것을 깨닫게 될 수도 있습니다. 이 문제는 쉽게 해결할 수 있습니다. 데이터셋 디자이너로 돌아가 필요한 내용을 변경하고 데이터셋을 저장하세요. 그런 다음 보고서로 돌아가서 보고서 메뉴에서 데이터 소스...를 선택한 후 "모두 새로 고침"을 선택하세요. "확인"을 클릭하고 보고서를 저장하세요. 보고서가 업데이트되었습니다.
결론
이게 전부입니다. 물론 제 예시는 실제 애플리케이션보다 훨씬 간단하지만, 개념은 동일합니다. 데이터 소스가 두 개 이상인 경우, 각 데이터 소스에 대해 위 과정을 한 번씩 반복하고, 런타임에 각 데이터 소스에 대해 ReportDataSource를 하나씩 추가하면 됩니다. 더미 DataSet 과정을 완전히 생략하고 .rdlc 파일에서 직접 스키마를 디자인할 수도 있지만, DataSet 디자이너를 사용하는 것이 훨씬 쉽고, 향후 변경 사항을 보고서에서 쉽게 업데이트할 수 있다는 점은 말할 것도 없습니다.


댓글